
Operation
Read and understand the Safety section before proceeding.
All references to left, right, front, or rear are given from the perspective of the operator in the seated position on the machine.
Wireless E-Stop Operation
Wireless E-Stop must be up and connected for mower to operate in robot mode. Push down Wireless E-Stop to shut down machine while operating in robot mode.
Emergency Stopping
Some situations, such as mowing on wet or muddy ground or striking an obstacle may cause a loss of steering control. If you lose steering control, perform an emergency stop.
Autonomous Mode
- Push RED Emergency Stop Button on handheld WIRELESS E-STOP controller;
- Or Press RED WIRED E-STOP BUTTON on left mower console;
- Or turn key to OFF.
Manual Mode
- Press RED WIRED E-STOP BUTTON on left mower console;
- Or turn key to OFF.
Start the Engine
Verify:
- PTO knob is in the OFF position.
- Parking brake is applied.
- Steering levers are in neutral position.
- If the engine is cold, pull choke knob up to ON position. If the engine is warm or hot, turn choke OFF.
- Throttle is set to low speed.
- Verify both the WIRED E-STOP BUTTON and WIRELESS E-STOP BUTTON are disengaged.
- Insert ignition key and turn to ON position.
- Verify that the 'Robot Power' button is not illuminated yellow.
If 'Robot Power' button is illuminated yellow, turn off 'Robot Power' button or disengage WIRELESS E-STOP BUTTON.
To Start Engine:
- Turn Ignition Key to START position. Release key when engine starts.
Do not operate the starter for more than 10 seconds at a time. If the engine does not start, allow a 60-second cool down period between starting attempts.
- If choke is ON, wait a few seconds after engine starts and then push choke knob down to OFF position.
Make sure choke is completely off. Engine will not run smoothly using partial choke.
- Machine may now be operated as a standard Zero-Turn mower.
For Best Mowing Results
- Cut grass when dry.
- Keep mower blades sharp.
- Keep mower deck properly leveled.
- Do not set height of cut too low. For very tall grass, mow twice.
- Do not travel too fast.
- Mow with the engine set at full throttle.
- Do not cut more than 2.5 cm (1") during any pass.
- Vary cutting pattern with each mowing.
- Do not allow grass or debris to collect inside of mower deck. Clean after each use.
Stop the Engine
- Ensure PTO is disengaged.
- Optional: Adjust engine throttle if desired.
- Set parking brake.
- Turn key to OFF and remove.
Autonomy Control Unit (ACU) Initialization
To prevent battery drain, ensure battery tender is plugged in or engine is running if ACU is going to be powered on for more than 15 minutes.
- Turn key to ON position.
- Turn on power by pressing the 'ROBOT POWER' button to the detent position. It will illuminate yellow or white.
- After booting up, LCD display will show the PIN number needed to connect to the AMR Mobile App.
- See Connecting a Smart Phone to the Machine.
You will not be able to connect to the machine until it is successfully connected to the network. The top right-hand corner of LCD display should not say NC.
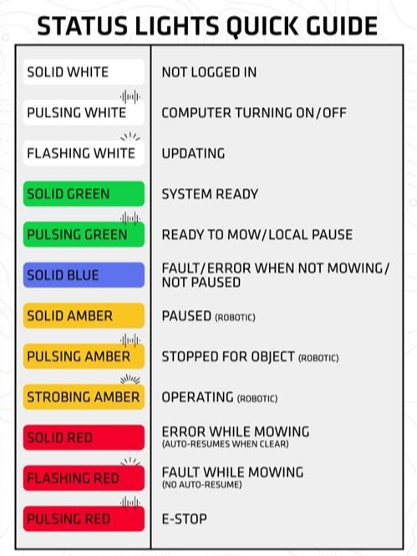
When ACU is on, machine status can be determined by the lights above the roll bars. See Figure 19.
Connecting a Smart Phone to the Machine
- Open the Mobile App and press "GET STARTED" button to navigate to the "Mow" page. If after pressing "GET STARTED" button, the "Connected Machines" page is not showing, press Connect at the top right of the screen.
- Press the Connect button located at the bottom of the screen and a dialog should appear asking for a Pin number.
- If no one is currently logged in to the machine, the LCD display will show two numbers: the Pin number and the Machine Serial Number. Look for the Pin number on the top left of the display and enter this number into the app.
- Hit OK on the dialog and the machine should be added to the list in the Mobile App.
If the Pin number is not showing, but the machine is booted up, another operator is connected to the machine. You can't connect to the machine until they disconnect, or the machine is restarted.
Create a Simple Mow™ Plan
The following procedure creates Simple Mow plans by driving the perimeter of an area to be mowed.
To begin a Simple Mow plan:
- Connect to the mower with a smartphone. See Connecting a Smart Phone to the Machine.
- The operator can sit on the machine. The LCD display will ask "Plan?".
- Press the green button. The LCD display now says "Planning!".
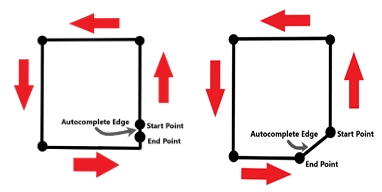
- Drive the perimeter of the desired mow area. Drive back to the beginning position. If the beginning point is missed, the machine will close the perimeter automatically.
- When the operator has reached the end of the perimeter, press the green button to finish the plan.
- LCD screen will ask: "Record Keepout?".
- To Record Keep-Out zones press the green button. Follow the steps on Recording "Keep-Out" Zones [Optional], otherwise press the red button.
- Afterwards, LCD display will ask "Save Plan?".
- Press the green button to save the plan.
- Plan is now loaded on the machine. See Mow Plan to start mowing.
Leaving a large gap between start and finish may produce undesired autocompleted edges. See Figure 26.
If the operator fails to throttle to 100% before activating the PTO, poor performance or damage to the machine may occur.
Recording "Keep-Out" Zones [Optional]
Before Recording Keep-Out zones, follow instructions on Connecting a Smart Phone to the Machine and Create a Simple Mow™ Plan.
- After pressing the green button after LCD display shows "Record Keepout?", drive to the beginning of the perimeter of the exclusion zone.
- Once at the point, LCD display will show "Start Recording?", press the green button and mow the zone perimeter.
- Once finished, press the green button to tell the mower it's done. The LCD display will show "Record Another?". If you would like to record another Keep-Out, press the green button and follow steps 1-3, otherwise press the red button.
- After recording all the desired Keep-Out Zones, follow steps 8-10 on Create a Simple Mow™ Plan.
Mow Plan
- Make sure engine is running.
- Load a plan from AMR Mobile App or create a Simple Mow Plan. See Create a Simple Mow™ Plan.
- Throttle down until Lidar booting is no longer showing on the LCD display / reached 100%.
- Make sure the throttle is at maximum.
- Make sure brake switch is not illuminated.
- Get out of the seat. Press the green button to begin robotic mowing.
- LCD display will start a 10 second countdown. Step away from the machine and after 10 seconds the machine will begin moving robotically.
To learn more about Mobile App features and how to best utilize these features, go to https://amroperator.com/Resources.